Windows 11 not booting
Having problems booting into Windows OS? Maybe you need to fix your boot sector! Try these commands and see if it works for you.
10/28/20255 min read
There are things that really aggravate me as a technician, and I'm sure for most other techs as well, is when a user calls and says "It just stopped worked out of nowhere". This gives me no clue or an idea of what the root problem could be and is usually never "out of nowhere". Usually a click in the wrong place or a movement that pulled a cable out is the cause for those problems, but what about when it really is "out of nowhere"?
Such was my situation, or at least it seems out of nowhere for me. For context, this happened shortly after replacing an old Dell computer. I tried being lazy and cloned the old HDD to the brand new 2.5" SSD, but this of course ended up causing stability problems so I reinstalled Windows 11 to ensure a clean start. Everything seemed fine for a few days until I got the call that the computer wont start and had a blue screen; every tech's nightmare on a Friday. In my case the BSOD error I got was that after the Dell splash screen the OS wouldn't load it would just jump into BSOD with the code 0xc0000225 which indicated that something went horribly wrong with the boot partition.
I tried every option given to me by Windows options in the error screen, except resetting the PC, which would've been the case if I hadn't found the commands I will explain. I tried many other commands like bcedit, DISM, sfc /scannow and others I can't even remember but nothing worked. It turned out I had to recreate the EFI partition. Below I dive into the details.
! ! W A R N I N G ! !
This worked for me. I cannot guarantee it will work for you, even if you have the same error code. Data is precious; I was ready to accept the risk of data corruption. Please ensure you take the proper precautions before attempting any fixes on the internet.
First of all, I have a Windows 11 bootable USB, so the first order of the day is to boot from a Windows bootable device.
I assume you know how to do this process, but its not very complicated:
Enter your BIOS settings
Look for Boot options
Sometimes you can get away by selecting the Windows USB as boot override, but if this doesn't work;
Look for Secure Boot options
Disable Secure Boot
Set Windows USB to boot BEFORE the computer OS
Once you've booted into the Windows USB, select Language, hit Next, select keyboard Settings, hit Next.
The next screen should be Select setup option, which in our case we should select Repair my PC


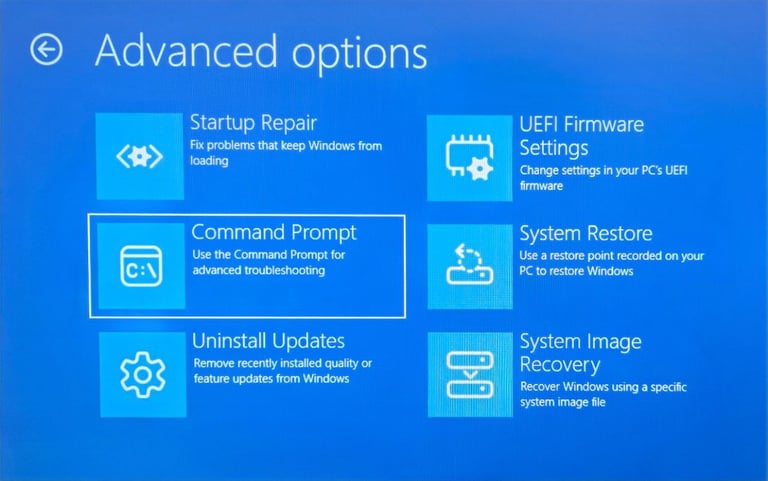
After selecting Repair my PC, you should be prompted to select the keyboard layout (select your preferred) and finally arrive at the Choose an option screen. From there Click on Troubleshoot > Command Prompt. It should look like this

Now the real fun begins.
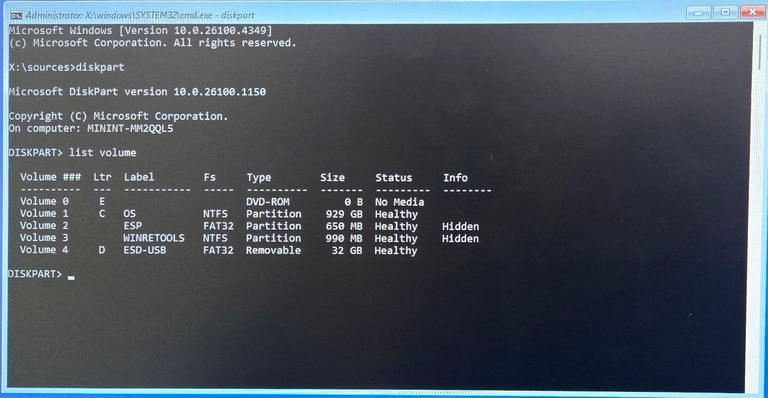
Enter DISKPART and hit Enter
Enter command list volume (identify your OS, IT WILL NOT ALWAYS BE C: check for size and Label)
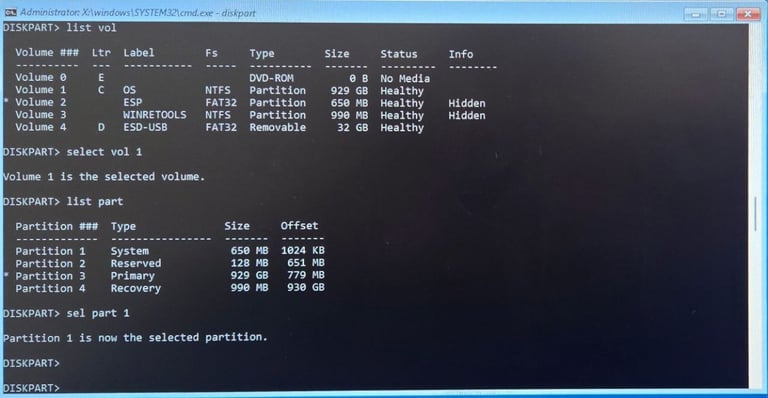
Now select volume # (replace # with the OS one identified previously)

Enter list partition to check the partitions. I understand partition 1 is the System EFI default, but always check. In my case it was Partition 1 so we select that: select partition 1

Now take a deep breath and enter the command delete partition override
Sure, maybe deleting the partition is a bit of an extreme measure and sure, maybe there are tools that could've fixed it but to be honest, I'd rather a fresh start with a clean slate rather than keep putting on band aids and hoping it wont come off.
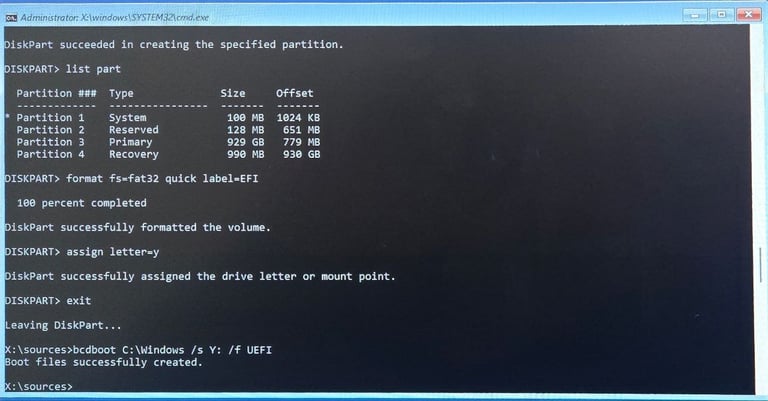
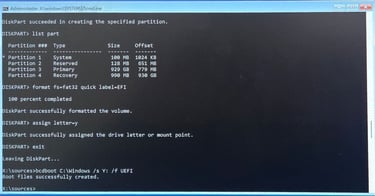
Before you freak out too much, enter the command create partition EFI size=100


Clean out the newly created partition by entering: format fs=fat32 quick label=EFI
For the coming up command we need the partition to be mounted to a drive letter (whichever fancies you, as long as it's not used by anything else, I choose Y), we do as such with this command: assign letter=Y
Now exit
Finally, run this command to properly establish the system partition: bcdboot C:\Windows /s Y: /f UEFI
bcdboot <-- Tool that helps configure windows boot files
/s Y: <-- Copies the BCD files from C:\Windows to the Y: partition
/f UEFI <-- specifies firmware type as UEFI
If all goes well you should receive a happy message reporting successful execution like in the image below.
At this point I restarted and after what seemed like the longest minute every I got into the OS!
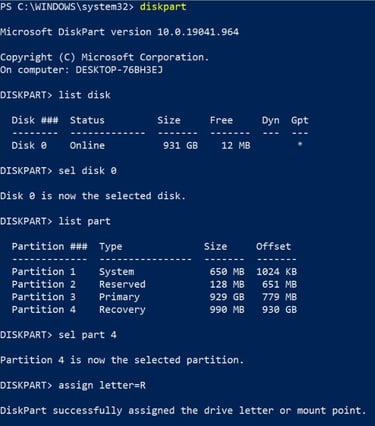
We're not done though! We still need to establish the Windows Recovery Enviroment (WinRE) boot image. We will do this using the REAgentC tool via Windows PowerShell as Administrator.
In simple terms: REAgentC is a command line tool that allows you to configure the WinRE for troubleshooting boot problems (like this one), allows Windows Reset and other recovery tools.
First of all, in PowerShell enter the DISKPART command and select disk 0 (or your corresponding disk). We need to identify the recovery partition. In most cases(like mine) it should be #4, so we use select partition 4 . If #4 is not your Recovery partition just select the partition number to the one labeled as Type Recovery.
Use exit to stop using the DISKPART tool for now.

Now we use the following commands to set the Recovery Environment:
reagentc /setreimage /path R:\Recovery\WindowsRE
reagentc /enable
Finally, go back into DISKPART, select the Recovery partition we assigned a letter to and use the following command to remove that assigned letter
remove letter=R
We do this to prevent conflict since it would be a mounted partition actively occupying a letter space. Once you remove the drive letter do command exit and breathe a big sigh of relief.
In Conclusion
Boot problems are some of the most aggravating and heartbreaking problems since sometimes(everytime) sfc /scannow does all but fix your boot problem. This guide was for people looking to recreate and re-registering the boot partition, in some cases this process will not solve and maybe even worsen your situation if applied incorrectly. Please be careful when handling data of any kind.
What's left is to do the mother of all restarts, which is a bit of a troubleshooting tradition of mine to validate the problem really is solved:
Shut down the computer.
Unplug power cable and wait 10 seconds.
Connect and power on the computer.
Wait until you reach the OS lock screen.
Restart and wait until it reaches OS lock screen again.
Redo this 4 times in a row.
Until now, this has been the best way for me to ensure boot problems really are solved.
This was the way I finally managed to get the computer to boot when all the other commands failed. Hopefully you get some value out of this!